Instructoring Process at PracticalCoding.in

If you’re here then you might be interested in being an Instructor, that’s awesome!

PracticalCoding.in is  started by a programmer just like you to share knowledge and make some extra cash. The fact that it could make a difference in someone’s life struck him hard.

So here  you will find all the details from process of being Instructor to creating your classes and courses.

Step 1: How to be Instructor at PracticalCoding.in:

We have only one rule, and we are not compromising on this

You have to be a programmer with at-least 3+ years of experience.

  1. If you are programmer with 3+ year experience, then send a mail to info@PracticalCoding.in, with below details
    1. Your present job details
    2. For which course you want to be an instructor (Ex Android, DotNet, etc)
    3. Pass as many your social profile links as possible – like LinkedIn, Blog, Stack OverFlow, GitHub, Twitter, Facebook, Quora, Slideshare, etc.
    4. Pass your previous works, it may be mobile application links, web app links, etc.
  2. We will schedule a video call, just to guide you through further process
  3. There after you’re required to record one webinar about any topic of your choice to attract learners. This will also be used in your course promotion page. We will rate you on the webinar. Some examples of webinars – for Android development, you can make a webinar talking about fragments or building a simple app; for web development course you could do a webinar demonstrating building a simple web app.

Once verified  at PracticalCoding.in you’re all set to sharing and earning!

Step 2: Course Creation:

  1. Theme: Build the course around hands-on learning and before end of course, learner should have built something useful.
  2. Class size: Another key thing for teaching is how many learners you will be able to manage. We have a standard rule
    1. For New Instructors, maximum learners count will be 3.
    2. For Experienced Instructors, maximum learners will be 5.
  3. Course Structure: You have full flexibility to create your own course or use our course structure. Some samples –  Android, Web(NodeJs and MYSQL) and Web(PHP and MYSQL)
  4. Schedule: You have complete flexibility in planning your teaching schedule – days of week, time of days, number of days per week and duration of a session and complete course. Make sure that the schedule is convenient to the participants. Normally our courses are of around 35-40 hours.  Below are our some existing course schedules.
    1. One of our Web instructor had scheduled the course with total hours as 36 for 3 months. He takes 2 class per week with each session of 1.5 hours. He takes one on Tuesday morning 7.00 AM – 8.30 AM and another on Thursday morning 7.00 AM – 8.30 AM.
    2. One of our Android instructor had scheduled the course with total hours as 36 for 3 months. He takes 2 class per week with each session of 1.5 hours. He takes one on Thursday night 9.00 PM – 10.30 PM and another on Sunday night 9.00 PM – 10.30 PM.
  5. Fees: Normally we charge each learner depending on course. The learner can pay it in 2 installments. We also have refund policy. Fees range from 12,000 – 30,000 Rs per learner based on course.
  6. Upload: Upload all the details on our site and you will get URL similar to http://www.practicalcoding.in/pc106.html. PracticalCoding.in will have all the rights to use/modify/remove the material uploaded.

Step 3: How learner get enrolled on to course?

  • We will showcase your course on our homepage and promote it too.
  • We will be sending out mails to all our subscribed users of PracticalCoding.in
  • You can also use your network and share it in your social networks.
  • When interested learner finds the course he can pay the amount and enroll the course.

Step 4: Tools to be used

  • PracticalCoding.in will provide you online teaching tool for doing skype like video conferencing with other enhanced features.
  • Payment gateway is provided by PracticalCoding.in
  • Google drive: To share course contents, sample code, etc.
  • Google form: For collecting feedback.

Step 5: Payment Details: 

  • The courses are priced depending on the market & your instructor rating – our research will help to arrive at the price tag.
  • You will be paid at end of the course – as per learner’s’ feedback.
  • Payment: Feedback is measured on scale of 10
    • You will earn 75% of total fees paid by learners, if you learner’s feedback score is at-least 9 .
    • You will earn 70% of total fees paid by learners, if your learner’s feedback score is less than 9 but greater than 8.
    • You will earn 60% of total fees paid by learners, if you learner’s feedback score is less than 8.
  • Instructor with an average feedback score of < 5 is delisted from PracticalCoding.in.
  • You will be paid to your given bank account details via the mode  of your choice NEFT OR Cheque.

Learn how to get your current location using GPS in android

In this article we will learn how to get user location in android their are two ways to accomplish this either by using GPS Provider or by Android’s Network Location Provider.We will be using GPS to get location.

First Let us know where we can use it
Knowing where the user is allows your application to be smarter and deliver better information to the user.
When developing a location-aware application for Android, you can utilize GPS and Android’s Network Location Provider to acquire the user location.

Lets get started!!
Create a New Android Application Project
Create a new project in Eclipse by navigating to File ⇒ New ⇒ Android Project and fill all the required details.

Add permissions to AndroidManifest.xml
To run our GPS Location Manager application, we need to provide the permissions given below.
1. ACCESS_FINE_LOCATION: This permission will give the application access to the GPS location coordinates.
2. INTERNET: This permission will allow the application to use the Internet. Add the lines of code below to your Android manifest file.

Put the below mentioned code to your AndroidManifest.xml
<uses-permission android:name=”android.permission.INTERNET”⁄>
<uses-permission android:name=”android.permission.ACCESS_FINE_LOCATION”⁄>

Using the Android Location Manager
We be getting your current location in Android using GPS. We will use the predefined LocationListener to obtain location information from the device.
In your MainActivity Implement a LocationListener and make a global object for the LocationManager and implement all the unimplemented methods.
public class MainActivity extends Activity implements LocationListener {
private LocationManager locationManager;

Next we check whether GPS is enabled or no, if not then we will prompt user to enable GPS
boolean isGPSEnabled = locationManager
.isProviderEnabled(LocationManager.GPS_PROVIDER);
if(!isGPSEnabled)
{
AlertDialog.Builder alertDialog = new AlertDialog.Builder(MainActivity.this);

alertDialog.setTitle(“GPS settings”);
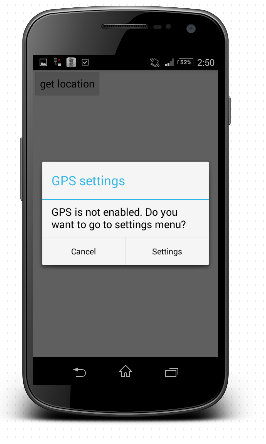
alertDialog.setMessage(“GPS is not enabled. Do you want to go to settings menu?”);
alertDialog.setPositiveButton(“Settings”, new DialogInterface.OnClickListener() {
public void onClick(DialogInterface dialog,int which) {
Intent intent = new Intent(Settings.ACTION_LOCATION_SOURCE_SETTINGS);
startActivity(intent);
}
});

alertDialog.setNegativeButton(“Cancel”, new DialogInterface.OnClickListener() {
public void onClick(DialogInterface dialog, int which) {
dialog.cancel();
}
});

alertDialog.show();
}

To get the current location we’ll be using the following
if (locationManager != null) {
Location location = locationManager.getLastKnownLocation(LocationManager.GPS_PROVIDER);
if (location != null) {
double latitude = location.getLatitude();
double longitude = location.getLongitude();
Toast.makeText(getApplication(),"latitude: "+ latitude +" longitude: "+longitude, Toast.LENGTH_LONG).show();
}

Have a look at the final code
package com.example.getlocationactivity;
public class MainActivity extends Activity implements LocationListener {
private LocationManager locationManager;
@Override
protected void onCreate(Bundle savedInstanceState) {
super.onCreate(savedInstanceState);
setContentView(R.layout.activity_main);
locationManager = (LocationManager) getSystemService(Context.LOCATION_SERVICE);
Button bt=(Button) findViewById(R.id.btn1);
bt.setOnClickListener(new View.OnClickListener() {
@Override
public void onClick(View v) {
boolean isGPSEnabled = locationManager
.isProviderEnabled(LocationManager.GPS_PROVIDER);
if(!isGPSEnabled)
{
AlertDialog.Builder alertDialog = new AlertDialog.Builder(MainActivity.this);
alertDialog.setTitle(“GPS settings”);
alertDialog.setMessage(“GPS is not enabled. Do you want to go to settings menu?”);
alertDialog.setPositiveButton(“Settings”, new DialogInterface.OnClickListener() {
public void onClick(DialogInterface dialog,int which) {
Intent intent = new Intent(Settings.ACTION_LOCATION_SOURCE_SETTINGS);
startActivity(intent);
}
});

alertDialog.setNegativeButton(“Cancel”, new DialogInterface.OnClickListener() {
public void onClick(DialogInterface dialog, int which) {
dialog.cancel();
}
});

alertDialog.show();
}
else
{
if (locationManager != null) {
Location location = locationManager
.getLastKnownLocation(LocationManager.GPS_PROVIDER);
if (location != null) {
double latitude = location.getLatitude();
double longitude = location.getLongitude();
Toast.makeText(getApplication(),”latitude: “+ latitude +” longitude: “+longitude, Toast.LENGTH_LONG).show();
}
}
}
}
});
}

@Override
public void onLocationChanged(Location location) {
}

@Override
public void onProviderDisabled(String provider) {
}

@Override
public void onProviderEnabled(String provider) {
}

@Override
public void onStatusChanged(String provider, int status, Bundle extras) {
}
}

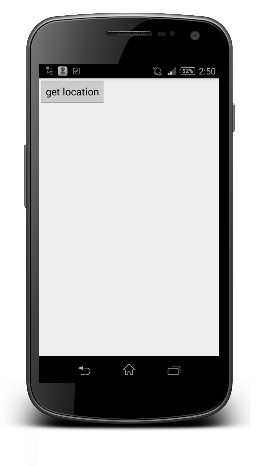
Our App
null
null

You can download the whole project here https://github.com/PracticalCoding/GetLocationActivity

Hope this article was helpful……..

Why you should choose PracticalCoding.in

Learning something new by self can be difficult, if their is someone who can guide and motivate you, you’ll learn better that’s what we do in Practical coding, It is a mentor based learning platform, So you’ll not be alone , the mentor will help you develop your coding skills.

Anyone can learn to code
Practical coding is destination for aspiring people who want to become programmer but don’t have knowledge about coding.We provide a platform where any one can learn to code. Our mission is make coding accessible to every one.

Experienced Mentor
Here at practical coding you’ll get to learn from experienced mentors who have 3+ years experience and working on the technology that they are teaching.Through out the course they will help you learn to code.

Practical learning
Here in pratical coding we believe the more you create the more you learn, So from day one of your course, you start coding. What we teach is relevant, only the necessary and applicable topics are taught to the learners.

Career
In practical coding we help build your career, People who took up course in practical coding felt that it is helping their career, they found a new suitable job for them.